Friday, June 28, 2013
Hello, Memory Bound friends!
Dawn has been hard at work on her new scrap room this summer, and we've all enjoyed watching her progress! (Click HERE to see our last post in the series.) Many of us have been wondering how Dawn utilized the wonderful double closet in the room, and now we have pictures! :)
Lucky for Dawn, her closet was already outfitted with wire shelving. She decided to move many of her plastic drawers and containers onto the closet shelving. As you can see in the photos below, now that she is all organized, Dawn has plenty of additional space left for more supplies!
One of the challenges with wire shelving is that smaller items sometimes tip over. As you can see on the shelf with the albums, Dawn solved this problem by placing a sheet of chipboard on the shelf. (You can also buy huge,1/8" thick acrylic sheets at the hardware store and have them cut to fit your shelves.)

One of the most important things you can do when organizing your space is to LABEL, LABEL, LABEL everything! This makes it 97% more likely (OK, I'm just making up that statistic but I'm sure it's true!) for your stuff to be put back where it belongs! :)

As you can see, Dawn labeled everything! This makes crafting both fun AND efficient!


Tuesday, June 25, 2013
Hello, Memory Bound friends!
Have you heard about our Girls' Night Out group? This lively bunch meets monthly for sharing, friendship, and inspiration. New members are welcomed with open arms! Just bring along any projects you've been working on -- cards, scrapbook pages, home decor pieces, sewing...anything crafty! -- to share.
These wonderful ladies regularly have crops at Memory Bound, go on outings (our last one was "junking" in the Ames area!), and take on volunteer causes to put their paper crafting skills to work. Take a look at some photos from our June meeting!
LeAnn and her niece Paige showed cards they've been making. Paige made her Father's Day card in our monthly Scrappin' Kidz class taught by Diana Tuttle.

Bonnie (whose face is hidden by a beautiful card!) is involved with Gigi's Playhouse in Urbandale, an organization which offers education and support to young children with Down Syndrome and their families. Bonnie started a program to make cards for Gigi's Playhouse and of course, the ladies of Girls' Night Out jumped in to help! They've been making TONS of cards! Read more about Gigi's Playhouse HERE.

Diana shared some awesome sample cards she made with some new stamps from Art Impressions. Diana creates a lot of wonderful cards available for purchase in our Staff Studio. Read more about our Staff Studio HERE!


RaNae showed a beautiful recipe album and card she recently made for her daughter. This cookbook has an amazing story!

In RaNae's words: "When my daughter was engaged to be married, I gave her a cookbook with completely hand written family recipes going back generations. It was full and covered many categories.
I purchased a cookbook, then added the recipes, the tabs for the categories, and a short note inside.
Well, she & her husband moved many times for his job, and during one move to Mayfield, Kentucky, they had a house fire and lost over half of their belongings. The main part of the fire was in the kitchen, so, needless to say, the cookbook was heavily damaged. The outside was completely bubbled up and charred. Part of the inscription was brown as were the clear pockets. But the recipes all survived with no smoke or water damage. So when they moved back home to Iowa, I told her I would get her another cookbook cover and insert the recipes.
Well, I went to where I bought the first one and of course, they didn't have any more, no cookbooks at all!!! So, after quite some time, I decided it was time to get her cookbook done. I was at a garage sale and found a green photo album, then the light bulb came on: I decided to make it into a new cookbook for her. Inside, I wrote her a new inscription dated the day I made the new cookbook and below it, I rewrote the original inscription from her first cookbook 7 years ago. When I gave it to her, she absolutely loved it! That did my heart proud."
What a wonderful project and touching story!

Jennifer shared a beautiful Christmas album she just finished. This was an inspiration to all of us to get those holiday pictures scrapbooked...before next Christmas rolls around!

We'd love to see YOU at our next meeting, scheduled for Monday, July 8, 6-7:30pm. It's always fun, inspirational, and FREE! Just give us a call at (515) 965-1102 to let us know you're coming!
Janet
Monday, June 17, 2013
Hello, Memory Bound friends!
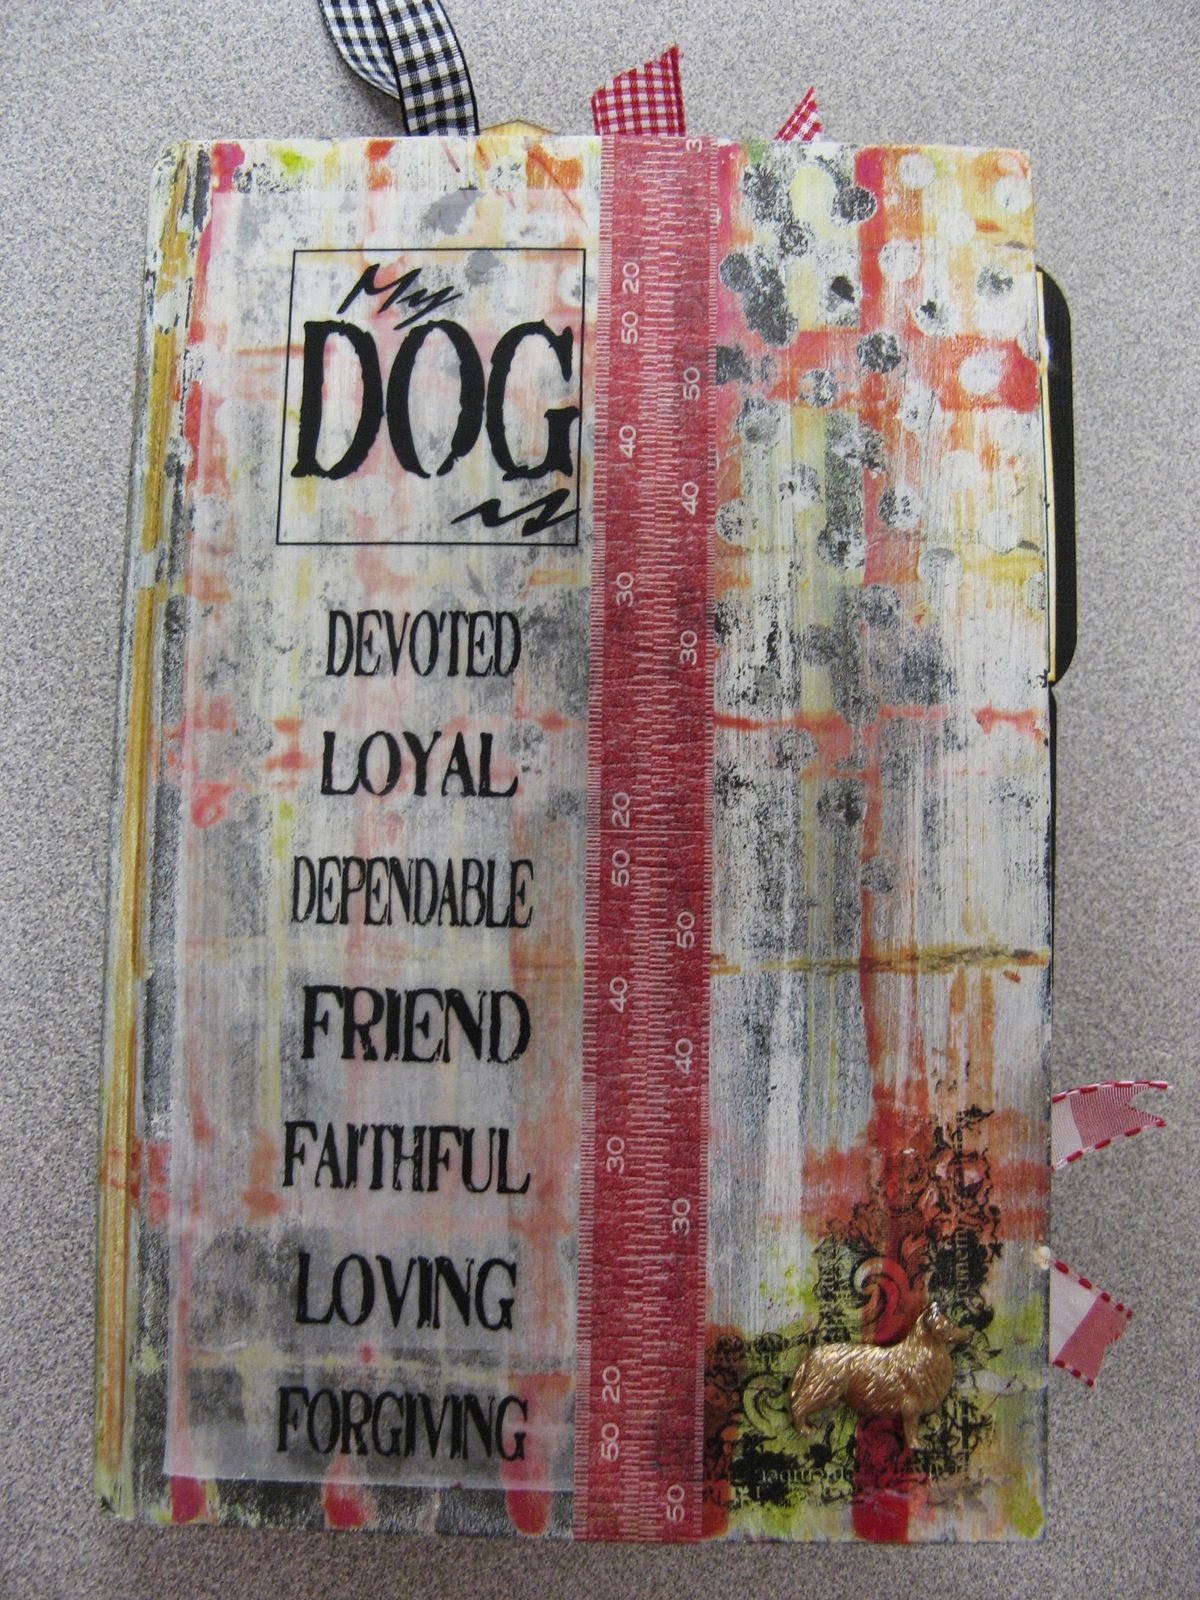
If you've got a pet (or three) in your life, you'll love today's post. I recently had the privilege of looking through a beautiful project made by our customer, Laura Armantrout. This is an altered book honoring the dogs who have been part of her life over the years. Laura shared her project at last month's Mixed Media Happy Hour. (If you'd like to start your own altered book, read more about this fun group HERE!)
Laura started with a book called Must Love Dogs. She altered the cover and many of the pages using a variety of creative mixed media techniques.

As you can see, she incorporated tags and other special memorabilia.
If you've got a pet (or three) in your life, you'll love today's post. I recently had the privilege of looking through a beautiful project made by our customer, Laura Armantrout. This is an altered book honoring the dogs who have been part of her life over the years. Laura shared her project at last month's Mixed Media Happy Hour. (If you'd like to start your own altered book, read more about this fun group HERE!)
Laura started with a book called Must Love Dogs. She altered the cover and many of the pages using a variety of creative mixed media techniques.
As you can see, she incorporated tags and other special memorabilia.

Laura's project includes beautiful details such as pockets, vintage photos, quotations, and hand stitching.

There are pages for each of Laura's dogs, including a journaling card with information about each one.


She incorporated favorite photos and dog tags.

Each page of Laura's book is a work of art!

In looking through her Laura's project, I could feel the love she has for her dogs!

Here are two wonderful photos from Laura's project.

Thank you to Laura for sharing her amazing altered book with us!
Janet
Wednesday, June 12, 2013
Happy Summer, Memory Bound Friends!
When it is summer, I don't work as often, due to the boys being at home, so it is ESSENTIAL for me to take some time and tour the store on the days I do work, to catch up on new product that has arrived at the store.
I sure wasn't disappointed on my latest tour!
First off, this just makes me happy!
Cuttlebug has an AWSOME new embossing folder called Mr. Maverick! It comes with a mustache embossing folder and a comb embossing border! How great!!
I wonder if this guy was the inspiration for the embossing folder!
Sorry...back to the tour.
With the nicer weather, you can't help but go on a bike ride! Or if you are like me, I think about riding my bike!

This die cut would be the perfect addition or embellishment to a biking layout!
We carry lots of family paper, but this sheet from Scrapbook Customs caught my eye!

This is perfect for journaling on a page or for a pocket in Project Life! The picture isn't the greatest, so I will share with you some of my favorite cards that I can't wait to use!
Rise & Shine: Our Morning Routine
I Love You to the Moon & Back: Nightly Routine
and my favorite
BAD MOM Moment (bad moments don't make bad mamas.)
The next item got a, "I DIDN"T KNOW WE HAD THESE IN!" screech from me.
Paper Smooches has a released whimsical number stamps!

It gets better!
The company has also released the following Number die cuts!

These are the Digit Dies. This set coordinates with the Digit Stamps! (YEA!!) Cut out the number and then line up the stamp so there is an even border around the stamped image!!

These are the Number Dies. This set can stand alone or combine them with the Digit Dies to create a mat behind these numbers. They are the exact shape of the Digit stamps.
Check out some of these amazing cards using the
Paper Smooches Digit Dies and Stamps!

If you enjoy numbers, then you have got to love these
Wood Letterpress Blocks by Bottle Cap inc.

Each letter stands five inches high and is three inches wide.

There are so many creative opportunities with these letters!

A little modge podge and pattern paper!

Or maybe paint is more up your alley!
Don't forget stencils or tissue paper!
If you want to check out more creative ideas with the wooden letters, check out the Bottle Cap inc. blog by clicking here!
Hope you enjoyed the latest tour of Memory Bound!
Until next time...
Happy Creating!
Katie
.
Tuesday, June 11, 2013
Hello, Memory Bound friends!
This is the final post about Dawn's beautiful new scrap room! We've been following along as she transformed an unused bedroom into a wonderful creative space in a matter of just a few days. It's amazing what you can do once you set a goal and focus on it!
If you missed our previous posts, click HERE.
Last week, Dawn added some finishing touches to her room. This is an important step in the process because creative spaces need to be both ORGANIZED and INSPIRING!
First, Dawn made this curtain to cover an existing shade which was too expensive to replace. It pulls together her color scheme!


The finished collage looks great! I love the black and white photos with the mix of frames.
This is the final post about Dawn's beautiful new scrap room! We've been following along as she transformed an unused bedroom into a wonderful creative space in a matter of just a few days. It's amazing what you can do once you set a goal and focus on it!
If you missed our previous posts, click HERE.
Last week, Dawn added some finishing touches to her room. This is an important step in the process because creative spaces need to be both ORGANIZED and INSPIRING!
First, Dawn made this curtain to cover an existing shade which was too expensive to replace. It pulls together her color scheme!


Next, Dawn started planning a photo collage for the wall above her shelves. Have you ever tried to hang pictures in a collage format? It is challenging, to say the least! Lucky for us, Dawn's daughter came to the rescue. Dawn says: "My darling daughter Amanda mentioned
an idea she saw on Pinterest. Make the same size images from newspaper
of the pictures you want to hang. Then put them on the wall so you know
where to put the nails. Oh, my goodness! Why haven't I done this before? It
made hanging our 6 pictures so much easier!"

The finished collage looks great! I love the black and white photos with the mix of frames.

Finally, Dawn wanted to create some art for her room. Here's how she did it:
"This glass is an old window Amanda
found in Iowa City for me. We painted a verse on it with car window
paint. She painted the printed words and I did the cursive. Now I
have a beautiful saying that we painted together. The entire piece cost
me $6.
Window - $2
Window paint - $3.50
Brackets for hanging - $.50
Time spent with Amanda - PRICELESS!!!"
As a side note, Memory Bound now carries car window
paint! Dawn and Amanda could have made the window project with vinyl letters cut with a Cricut, too.


We have loved watching Dawn transform her space. Now she never wants to leave it! We are excited to see all the beautiful projects she will create in her organized and inspiring room.
Thanks for sharing your amazing project with us, Dawn!
Janet
Thanks for sharing your amazing project with us, Dawn!
Janet
Sunday, June 9, 2013
Hello, Memory Bound friends!
June is BIRTHDAY MONTH at Memory Bound! We have fun birthday activities and projects throughout the month, including birthday card make-n-takes. This month's make-n-take cards were designed by Maggie using the awesome Tim Holtz blue-print stamps. Each Wednesday in June we'll feature a card made with one of the stamps and a variety of fun techniques!

Here's the card we'll be making on Wednesday, June 12. Stop by anytime between 1 and 6 pm to make this adorable card for just $2!

Janet
Friday, June 7, 2013
Hello, Memory Bound Friends!
With Father's Day quickly approaching, I thought I'd share a few Father's Day cards ideas!

This fun card was created by the October Afternoon design team.
With Father's Day quickly approaching, I thought I'd share a few Father's Day cards ideas!
This fun card was created by the October Afternoon design team.

Using the Taylored Expressions Spectacles die and a mustache die cut, you can have the card created in minutes!

October Afternoon Travel Girl Subway Token paper
used on the father's Day card.

This paper from Jillibean Soup Macho Nacho collection has long been a favorite of mine! It would make perfect Father's Day cards!

What an original idea on how to use the ties from the Jillibean paper!

Lawn Fawn has a great Father's Day stamp set!

These two cards were created using fun paper and the Lawn Fawn stamp set!

If you would like to see more ideas with the Lawn Fawn stamp click here!
Happy Creating!
Katie
used on the father's Day card.
This paper from Jillibean Soup Macho Nacho collection has long been a favorite of mine! It would make perfect Father's Day cards!
What an original idea on how to use the ties from the Jillibean paper!
Lawn Fawn has a great Father's Day stamp set!
These two cards were created using fun paper and the Lawn Fawn stamp set!
If you would like to see more ideas with the Lawn Fawn stamp click here!
Happy Creating!
Katie
Subscribe to:
Posts (Atom)